The Famous Spagetti Squash Pizza

As you know I host a virtual online fitness group helping other women get fit too. Inside that group, I share what I eat each day my own personal recipes and this recipe has spread like WILDFIRE. One day I had some already cooked spaghetti squash in the fridge, it was Friday night, and Josh and I had been working on the rental all day. It was for sure a pizza kinda night but I have been working my way back to fit after recovering from my double mastectomy, reconstruction, and what I thought to be my body rejecting the implants nope just mono. I know fun haha! I was focused and this genius was born!

I mixed up all these ingredients not really sure what would happen, It turns out it was magic and ALL OF US make this multiple times a week and our husbands are requesting it too, so thought I would share!

IMG_9917.jpg

Makes 2 personal pizzas

Ingredients

For the crust

  • 1 small spaghetti squash cooked and shredded ( if you don’t know how to do this cut squash in half, scoop out seeds spray with olive oil spray, salt, and pepper, put on a tin foil-lined sheet pan, cut side down bake for 30-35 min at 350. Let cool.. using a fork scrape the flesh out down to the skin

  • 2 eggs ( 2 flax eggs for Vegan option)

  • 2 tablespoons almond flour

  • 1 teaspoon garlic powder

  • 1 teaspoon onion powder

  • 1 teaspoon salt

  • 1 teaspoon oregano

  • olive oil spray

Toppings

  • 1 cup any cheese you like ( Vegan cheese option)

  • 1/2 cup any shredded meat ( jackfruit option) I have been obsessed with shredded pork or chicken bbq which is what I used in this recipe. I use the instant pot, 3 chicken thighs with 1/4 cup bbq sauce cook on manual, high pressure for 20 min. I put it in wraps, quesadillas, stuffed baked potato, and more importantly this pizza!!!!!!

    6 tablespoons of BBQ sauce

  • 2 tablespoons finely chopped red onion

Directions

  1. Preheat oven to 350 and spray 2 pie dishes with olive oil spray, set aside

  2. Use a paper towel, clean dishcloth or cheesecloth to squeeze out any excess liquid from the squash

  3. place in a bowl with eggs, almond flour and spices mix with a fork

  4. Place 1/2 the crust mixture in each pie pan and pat down with a fork, cook for 15-20 minutes until firm and a little browned on the edges

  5. when done spread 2 tablespoons of sauce on each pizza , add your cheese, meat, and onions to each one

  6. pop them under the broiler until the cheese is melted and bubbly

  7. drizzle the last tablespoon of bbq on top of each pizza and ENJOY!

I would love for you to tag me on IG if you make this and let me know what you think @lisamhauck love seeing you make my recipes!

RECIPE TIPS-

I like to cook a squash each weekend and have it in the fridge for this recipe makes it super simple and we’ve been eating this each week so meal prepping it was a no brainer

I recommend roasting the squash overusing the instant pot because the squash ends up too watery. You can do it this way just make sure you squeeze the water out.

Ideas of different pizza, we have done pepperoni, roasted veggies, the bbq one and NOW I want to try buffalo mozzarella, tomato and fresh basil to do a margarita style so you can get very creative with this!


How I am creating responsibility and structure for the kids WITHOUT going crazy

Hey all!

I have been asked to share this system I am using for the kids who have been home from school due to COVID-19 and at this point, we are not sure what the next year holds. in the beginning, I followed the masses with the “daily school schedule” having times to be working of some school work, playtime, lunchtime, creative time… ALL THE TIMES. After a bit I constantly felt like I was having to keep everyone on schedule and reminding them what to do, meanwhile with everyone being home my mom duties were piling up and I was spending what felt like all day in the kitchen and cleaning.

Some days I felt like I didn’t have much time for the things that I personally wanted to accomplish in the day leaving my cup empty and frustrated so this was my solution.

I have a 10-year-old boy and an 8-year-old girl- I will address how I would modify for younger kiddos later in this post.

I created this design in Canva and laminated it to allow the kids to create their own schedules, learn responsibility, still use their brain and have limited screentime along with active time too! ALL WITHOUT ME! Sayyyyyy whaaaaaaa. Yes mamas here is an example of what we are doing

Blue Peach and White Brush Stroke Illustration Chores List (1).png

We are allowing 4 hours of screen time daily 2 in the am and 2 in the afternoon. I wanted them to have specific tasks before they could start screen time. I found the kids would easily wake up and go straight to watching tv or tablet time if I allowed it. Now they will mark off with an expo marker ( because I got some laminating sheets from Walmart) when they have done there am self-care tasks, a chore of choice and 30 minutes of reading and 30 minutes of math ( which is a FUN game online that they love and is hands-off for us parents but allows us to track their progress) They can then have their free time. I can simply go check to make sure the bed is made etc…… if they did not make the bed and crossed it off they will lose that day of screen time and if it occurs again that day plus the next ( so far no issues the kids are LOVING this) It takes chores off my plate, teaches them how to be responsible and THEY are in control of their own day.

For the active time we got them a kids Fitbit watch so we can see their active time, steps, even sleep patterns too. Its been nice because we will go on walks together as a family after dinner to get some extra steps in for all of us. The afternoon work is them choosing 2 pages out of a summer blast workbook that I purchased off Amazon that is grade appropriate. I love including a little something so they are using their brain and not just becoming a total couch potato!

They now have an agenda to complete and tasks to focus on that will help them!

Here is a link to the graphic that I have created, I used Canva to create it. It's free for you to use and adjust just click the file and make a copy for yourself. This way you can edit tasks, add your child’s name, and colors to personalize it to your famili’s needs.

If your children are younger and can’t read but you want to give them some responsibility I would change the words out with pictures and make this your own! just search in the search box inside Canva to find pictures to go with chores or self-care items.

I truly hope this helps your family as much as it had helped mine. I think we moms will take on the world and try to “do everything” then get burnt out and frustrated because we take on the world. I try to remember that my husband and children can’t read my mind so asking for help from your spouse and children is important. We all live together so it should be a joint effort to get clothes cleaned, dishes washed and plants watered!


Zesty Vegan Crunch Salad

As I have tried to reduce meat and dairy in my diet due to inflammation, I just feel better when I am more plant-based but I have eaten meats and cheese all my life so this transition is not an easy one or a quick one. I LOVE C H E E S E and I find that has been one of the hardest things for me to change. I realize that my body may not like all the things that my tastebuds do. So I have started testing some new recipes and OH MY is this a winner!

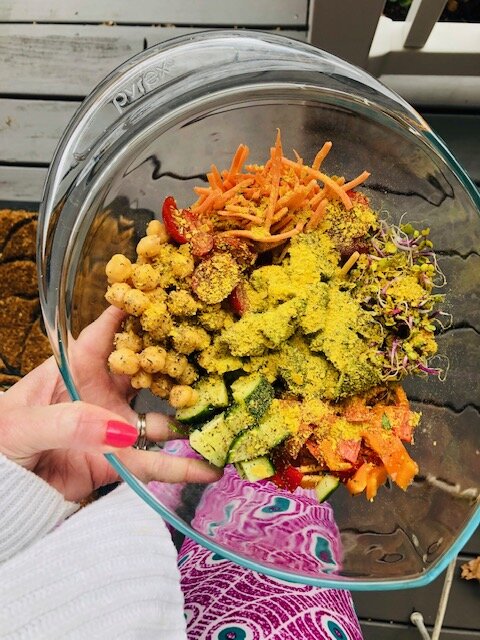
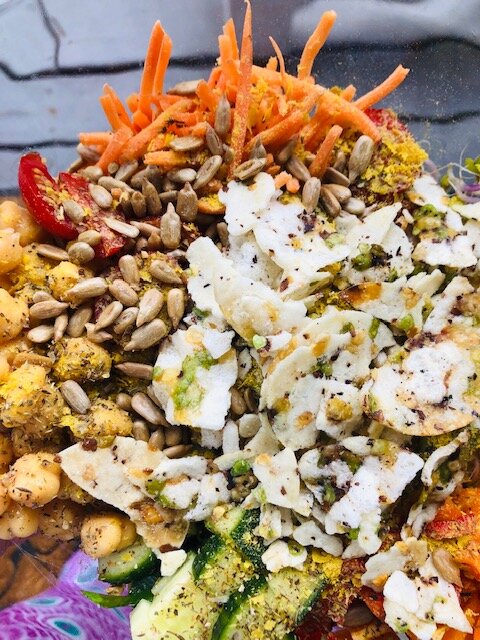
This Vegan salad is not your average salad, it’s one you will CRAVE, I ate 4 times last week for lunch!

image1 (41).jpeg


Ingredients

  • 1 1/2 cups spinach chopped

  • 1/4 cup shredded carrots

  • 1/4 cup chopped cucumber

  • 5-6 cherry tomatoes chopped

  • any kind of sprouts ( totally optional, I had them in the fridge)

  • 1/4 bell pepper

  • 1-2 tablespoons nutritional yeast

  • salt and pepper and oregano to taste

  • 1/2 cup white beans

  • Juice of 1 lime and 1 lemon

  • 2 tablespoons roasted salted nuts of any kind, I used sunflower seeds or pumpkin seeds

  • 1/4 cup crunched veggie crisps or tortilla chips. I personally used Off The Eaten Path Veggie Crisps from Costco

  • 1/2 avocado


Directions

  1. Combine lettuce and veggies add avocado, salt pepper, yeast and lemon, lime juices and toss well until the avocado and juices are coating all veggies well.

  2. Add in nuts and crunches, mix and taste

  3. Adjust seasoning and enjoy

    You can adjust any veggies you have in the house these were the veggies I had in the fridge and pantry items! This particular salad was SO good was because of the creamy tart “dressing” from the avocado and citrus juices along with the salty crunchy nuts and veggie crisps.

Need to burn off energy at home during quarantine?

I know this time has been so full of change and being home can get us feeling sorta slumpy for both us and the kids so here are some FREE resources to use to change the mood of any household with some great at-home workouts for you and the kids!

I have personally been using these workouts for the past 5 years and they have truly helped me get into amazing shape so if your gym is shut down and you need something give this a try! Maybe you are choosing to take this time to start some healthy habits!!! Either way, these will for sure lift your mood and help to keep you sane!

You don’t need a ton of space or equipment to do these… I have been getting my workout in in the morning while the kids are getting up, having breakfast, brushing teeth and getting dressed. Such an amazing way to start the day and puts me into a good mood which we know our mood affects everyone around us. Keeping it positive and upbeat is crucial right now.

The kiddos need this just as much as we do! Sorta like PE for them all set to music with instruction so they can burn off the wiggles!

I hope these free resources help you during this time of change. I would LOVE to have your tag me in your stories on IG of your kiddos working out or a sweaty selfie of you after your workout. Better yet would love to see part of your workout like I showed above from mine yesterday!

Stay healthy my friends!

Blueberry Bread Pudding

As I have tried to reduce gluten and dairy in my diet due to a PCOS diagnosis I rolled my eyes hard because well I LOVE both of those things. Like C H E E S E come on! But I realize that my body may not like all the things that my tastebuds do. So I have started testing some new recipes and OH MY is this a winner!

Dairy-free, gluten-free, and no refined sugar and you could NEVER tell the whole family loved it so much it was requested for a warm breakfast again this week, I was happy to make it since it comes together in about 8 minutes. This casserole takes an hour to bake but since that is the hands-off time it’s very easy!

image0.jpeg

Perfect for fall/winter mornings and meal prep because it reheats like a DREAM!

I have this as a plate it breakfast adding protein on the side like some nice chicken sausage or my Superfoods on the go!

Ingredients

  • Ingredients 8 large eggs lightly beaten

  • 2½ cups unsweetened almond milk

  • ¼ cup pure maple syrup

  • 1 tsp. pure vanilla extract

  • 1 tsp. ground cinnamon

  • ¼ tsp. sea salt (or Himalayan salt)

  • 8 slices low-sodium sprouted whole-grain bread cut into 1-inch cubes

  • 3 cups fresh (or frozen) blueberries

  • Nonstick cooking spray and Hot water

Directions

  1. Combine eggs, almond milk, maple syrup, extract, cinnamon, and salt in a medium bowl; whisk to blend. Set aside.

  2. Place bread and blueberries in a 13 x 19-inch baking dish that is lightly covered in spray. Top with egg mixture; mix well to blend.

  3. Preheat oven to 350° F. Place baking dish in roasting pan. Add water to roasting pan to come an inch up the side of the baking dish. (Baking dish will be sitting in water.) Tent aluminum foil over roasting pan so that foil does not touch bread pudding. Cut two slashes in foil to allow steam to escape. Bake for 35 minutes. Remove foil. Bake an additional 35 to 45 minutes, or until bread pudding is puffy and custard is set. Cut into eight pieces. (be very careful removing from the oven as the water in the roasting pan will be VERY HOT)